Setting up a Sync Profile
There are 10-11 configuration steps in a PowerSync profile (one extra step for Assets). Here’s a summary of how to configure a profile.
To create a new profile:
- Start at the dashboard (click on the home icon to get there).
- Click on the Description of the profile you want to configure.
- Fill out the information requested in each task and click the Next button at the bottom of the page to proceed to the next step.
Step 1: Profile Definition
The Profile Definition step defines your profile (as you might expect), with four fields to fill out: Profile Name, GIS Layer, Dependency, and GIS Where Clause:
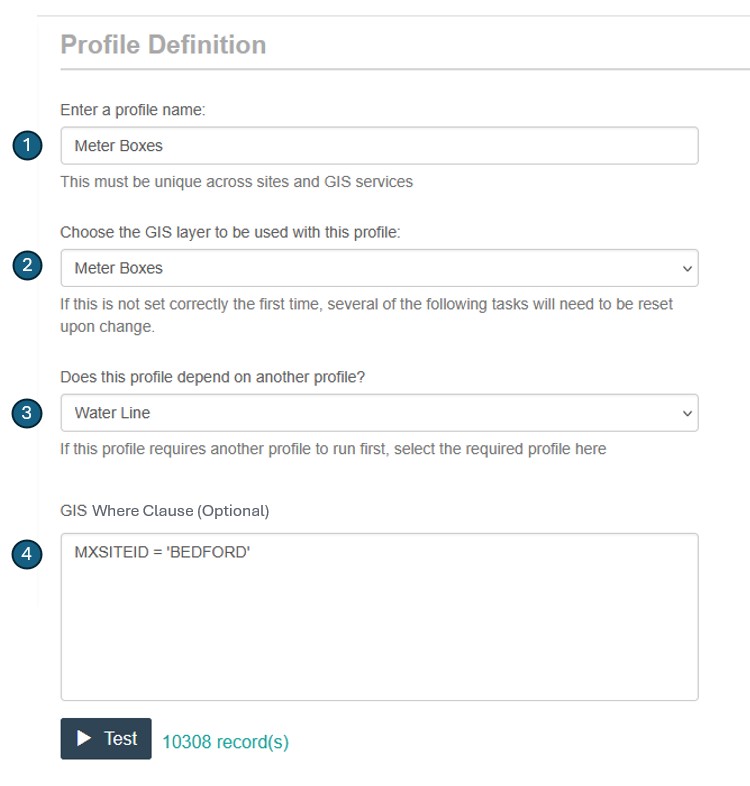
- Profile Name. Give your profile a unique name.
- GIS Layer: Choose the GIS layer from the GIS service you want to associate with this profile.
- Dependency: This step allows you to define another GIS layer that must be synchronized before this profile. Typically, this is a scenario where there are parent/child relationships between layers where, for example, a Maximo location must exist before the asset that is associated to that location. Based on your choice here, PowerSync will adjust the order of the data processing, so the parent profiles process first.
- GIS Where Clause: Here you can enter a where clause (or definition query as it is called in GIS) for the data to be synchronized. This is valuable when you only want a subset of the GIS data from a given layer. This can be helpful when using a layer from the Esri Utility Network, which typically has multiple feature types in one GIS layer. For Maximo, this is important because users typically want to apply a classification to a data set (e.g., HYDRANTS, WATERLINES, and so on). The where clause allows the person configuring PowerSync to filter out any unnecessary GIS data for a given Maximo classification.
Step 2: Asset or Location.
Choose whether you are synchronizing an Asset or Location.
Step 3: Classification.
Choose a Maximo classification from the dropdown list of options. The dropdown is pulling its list from Maximo, so if you don’t see the option you want, it’s either because your classification isn’t created, or because you are using a user that doesn’t match the site for the classification, or because the Maximo classification isn’t designated to be used with the type of record you are trying to create.
Step 4: Match Key Fields
Here you select 1) a Maximo field for uniquely identifying the Maximo asset or location and 2) a GIS layer field which corresponds to the Maximo field. This becomes the linkage between the two record sets.
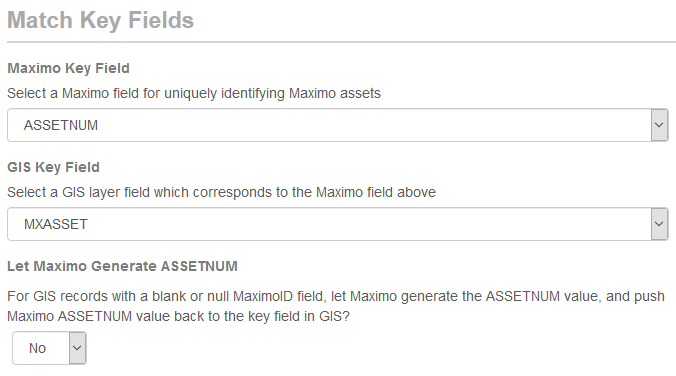
If you choose the “Yes” option for Let Maximo Generate ASSETNUM, Maximo will use whatever sequencing is enabled there and assign the new asset number accordingly, and then PowerSync will send that value back to GIS. You’ll need a feature service configured in your PowerSync settings to write this data back.
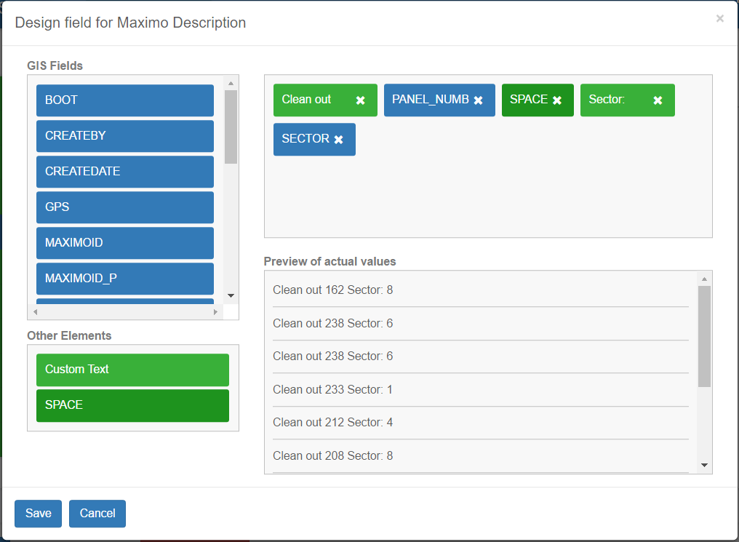
Step 5: Description
How do you want to describe each Asset or Location? You have the option to either set static text for all records, use a GIS layer field, or build a description based on GIS fields and user-defined text (concatenation).

To bring up the description builder, click on the box (as shown with the arrow above). The Description Designer allows you to drag GIS fields into the pallet on the top right (see image below) and add custom text and spaces to create a custom description based on the information you select.
Step 6: Linear Asset.
If you’re wanting to import linear segment length (measurement) information from line segments in GIS, choose Yes and answer the other questions. Note: Before you can start working with linear asset measures in PowerSync, you must have Maximo Linear installed, and you must create at least one linear referencing method in Maximo. A linear referencing method (LRM) determines the position of a linear asset, based on a start point, a measure, and a direction. For more info, see: http://www.ibm.com/support/knowledgecenter/SS3AXP_7.5.0/com.ibm.lam.doc/lam/t_ctr_config.html
Step 7: Parent Location.
Here you specify what the parent location is. You can either:
choose a static Location value from Maximo (it must exist already in Maximo), or
choose a field from GIS to populate the value. If you choose option 2, you’re asked if those GIS values are associated with another GIS feature class. If so, answer Yes and then select the other feature class that field represents. For instance, if you have a Valve that has a Parcel as a location parent, you need to choose the field in the Valve feature class that contains the Parcel’s ID. Then you need to choose the Parcel feature class. Obviously, this means that if you use this method, both feature classes must be in your Esri map service together. Note: This is important because it controls the sequence by which the sync profiles are processed.
Step 8: Parent Asset.
This follows the same logic and process as Parent Location.
Step 9: Specifications.
Here you choose which GIS fields populate the specifications for a given classification.
Step 10: Maximo Fields.
This is a catch-all section that contains all the Location or Asset fields you might want to populate. For instance, if you want to overwrite the default Status value, you could specify something here. Note. Anything you change here will supersede anything you specified in the previous tasks.
Step 11: Test Run.
Now you are ready to do a test run. Clicking the Start Test Run button will grab the first 1-10 records in GIS and try to process them. Once completed, you’ll see a list of results that include the data that was processed and any error that resulted. Once you are satisfied with the results, you click on Activate Profile to begin synchronizing the complete data set.