Input Node
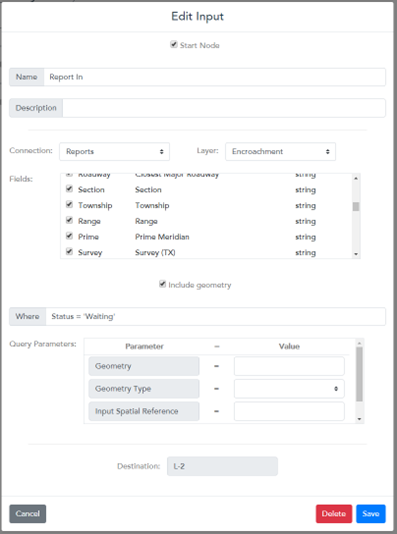
Every Nash workflow needs an input. Inputs bring in data from outside connections. After you add your first input node, you also need to set a start node in your workflow and connect it to your input. Choose the connection that you would like to pull data from. Then choose a layer or object. GIS inputs allow you to bring geometry as part of the object. Many geometry tasks are optimized for point data so be cautious and test using geometry on lines and polygons thoroughly.
As shown in the image below, you can choose which fields from your connection will be passed along into the workflow. Make sure you check all the fields that you will want to use later in your workflow.


Where Clause
The “Where” clause is the most important portion of your input. On the start input node you need a static where clause that will return only the data you require. For instance, if you want to fetch all the new inspections from an ArcGIS rest service, your where clause would read something like Status = ‘Waiting’. The where clause can also use substitutions or references to fields in other nodes (more on this later). Some things to be aware of:
- GIS uses single quote (‘) marks for querying strings. See the documentation for the where clause in ArcGIS here. It is recommended that you perfect your where clause in the GIS rest endpoint then copy it into Nash.
- The test button in Nash will not return valid information if you have a substitution in the where clause.
- GIS domains are stored and presented as the code values. So, the domain will read as ‘Waiting for processing’ for the user but to query it you would have to query the coded value of ‘Waiting’. Maximo where clause details are covered in the document linked here. [Specifically, pay attention to Section 5 – Filtering data using WHERE clause.] But here are a few key items to note:
| Operator | Description | Usage |
|---|---|---|
| = | Equals | status=”WAPPR” |
| >= | Greater than equals | priority>= |
| > | Greater than | startdate>”iso date” |
| < | Less than | startdate<“iso date” |
| <= | Less than equals | linecost<=150.00 |
| != | Not equals | priority!= |
| IN | In clause | location in [“A”, “B”, “C”], priority in [1, 2, 3] |
You can also query esriFieldTypeDate (date-time) fields in two different ways: by DATE or TIMESTAMP date functions. Each type of ArcGIS date-time query must include a date function to make sure the query is treated in the proper way.
<DateField> = DATE 'YYYY-MM-DD'<DateField> = TIMESTAMP 'YYYY-MM-DD HH:MI:SS'
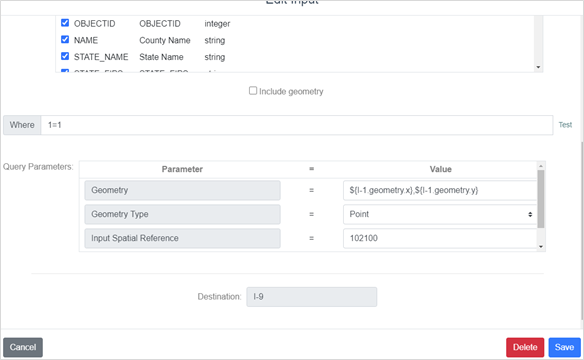
You also have the option of querying the input by the input geometry (example shown below).

Click the “Include geometry” check box if you want to bring the geometry of the record along in the flow.
Then choose the type of Action you desire, either: 1) Insert, for adding new records, or 2) Update, for updating existing records.