MapEngine for Mobile
Launching MapEngine
- Open Safari
- Navigate to the MapEngine link provided to your company.
- Log in with your Maximo username and password.
Menu Options
![]()
In MapEngine for Mobile you’ll find a simple menu bar at the top. Each symbol will be described below.
 Map Selected Features Menu
This allows you to access several ways of defining the results that are displayed in your selection results.
Multi-work order selection – polygon
- Select the Map Selected Features icon.
- Select polygon icon.

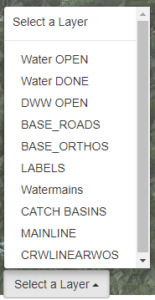
- Select the layer(s) that you want it to gather from.
- Draw on screen to select.
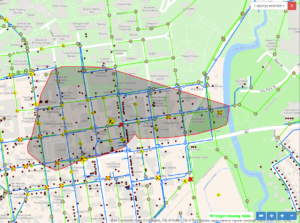
- Work order list created.

 Bookmarks menu
The bookmarks menu allows you to save a variety of locations that you may want to access quickly. The first location is your home location and then the user is also able to define and name other locations.
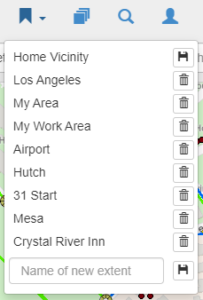
- Home vacinity – takes you to pre-set area of the map.
- configurable by zooming to the desired area and then saving the area.
- You can also add other areas by typing the name in the Name of New Extent box and then click the Save icon.
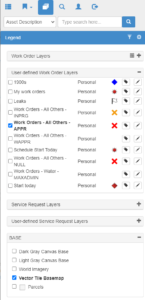
 Legend
The legend allows you to control what is being visualized on the map in MapEngine. Below is a list of the types of items you will find in the list:
- Work order layers
- Basemaps
- Asset type layers
 Search
The search allows you to find specific work orders, assets, and locations.
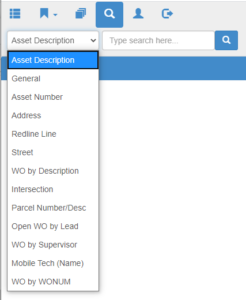
- Use dropdown menu to search by different categories.
- Use boolean terms to narrow down results.
- Once you select the item you are searching for then it will take you to that item on the map.
 My Work
The first page you see when launching MapEngine will be your My Work list. It will show work orders assigned to you as defined by a query set up by your system administrator.
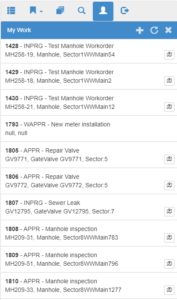
Options from My Work List.
- On the right side of each work order you can click on the map icon to see where the work order is located.
- If there is no map icon than the listed work order is not mapable.
- Select the text of the work order to go to a details view for the work order.
- From the details screen you can select the left and right arrows to toggle through your work order list while remaining in the details screen.
Edit Work Order
- Select desired work order.
- Select the edit button.
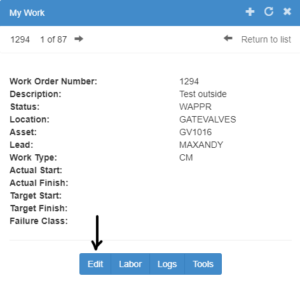
- Fill out appropriate fields on the work order.
- Submit work order.
You can also add work logs, labor codes, and tools to the work order.
Work Logs
- Select desired work order.
- Select the logs button.
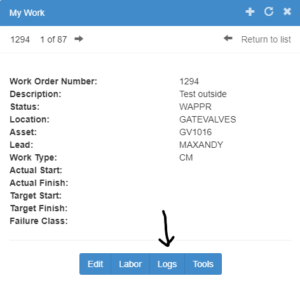
- Select log type.
- Fill in summarry and details fields.
- Submit work log.
- Log will be attached the work order selected.
Create a work order
- Open My Work list.
- Above the list click on the plus icon.

- Add in asset and location information. (Information will be validated with your Maximo data.
- Add description and other required fields.
- Submit work order.
*Work order visibility will depend on asset type.
Create a work order by selecting an asset.
- From the map view, click on the asset that needs a new work order.
- Select the name of the asset to open the details view.
- Select the Create Workorder button.
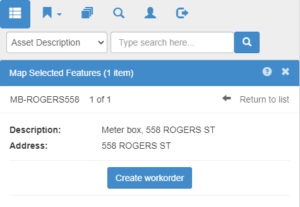
- Asset and location information are automatically filled in so you will only need to fill in the details and other required fields.
- Submit work order.